YOGA CHALLENGE FOR BEING PRESENT (balance and stability postures for focus)

Join me and let’s take a stand to improve our balance, stability and strength. The price of balance is constant attention or in the language of yoga. “being present.” When we focus on the task at hand, our extraneous thoughts will dissolve. Such focus instills a deep sense of calm as we exist in the here and now. Meanwhile, our entire body will be working to hold us up from the bottom of our feet to deep inside our brains. Don’t worry if you wobble or fall over, everyone does. The key is total focus, continuous breathing, a positive outlook and a,” I can do this mindset! If you practice this sequence weekly and regularly, soon balancing on one foot, will be as steady as a flamingo!

Here are a few tips to help you get started:

  • You may find that keeping your eyes fixed upon an object in front of you will help you stay focused.
  • You can use a wall or a chair for support.
  • You can bend both knees before lifting one leg
  • Keeping your knee bent will also make it easier.
  • You can put extra weight on the outer edge of your standing foot.
  • You can spread your toes and the ball of your standing foot to enhance equilibrium.
  • You can use your arms to balance and help stabilize your body like a tight rope walker.
  • To increase your strength in each pose, try holding each pose for long periods of time and repeat a few times.
  • Taking what you learn in a yoga class off the mat and into your life is what yoga is all about. Add words of wisdom from our Creator and we have a recipe for lasting peace. For God says, don’t dwell on the past. (Isaiah, 43:18-19.) Don’t worry about the future.( Matthew 6:34.) To find soul strength and stability just believe, “The steadfast love of the Lord never ceases.” Lamentations 3:22.

1.) Star Stretch

  • Extend your legs to your sides to a place that is comfortable for you.
  • With a big inhale, extend your arms out to the sides, letting them meet overhead.
  • Go slow as you breathe deeply 3-5 more times, inhaling as you extend up and exhaling as you lower your arms.
  • On your last exhale, when your arms are extended but at your sides, gently twist and fold over your right leg. Breathe deeply for 3 counts, then come up.
  • Repeat the exercise, twisting over your left leg for 3 deep breaths.
  • Twist over each leg a total of 3-5 times each breath.


2.) Triangle Stretch

  • Pivot your right toes to face your right side.
  • Slightly turn your back toes in.
  • Keep your heels on the same line if possible.
  • Your legs should be straight, but you may bend them for more support.
  • The distance between your legs should about two and a half feet.
  • If you feel wobbly, find the position where you feel more balanced. The perfect place for you IS the perfect place to start the Triangle Stretch.
  • Stretch over your forward right leg with 5 deep breaths.
  • Use a table, chair, or wall for support if necessary.
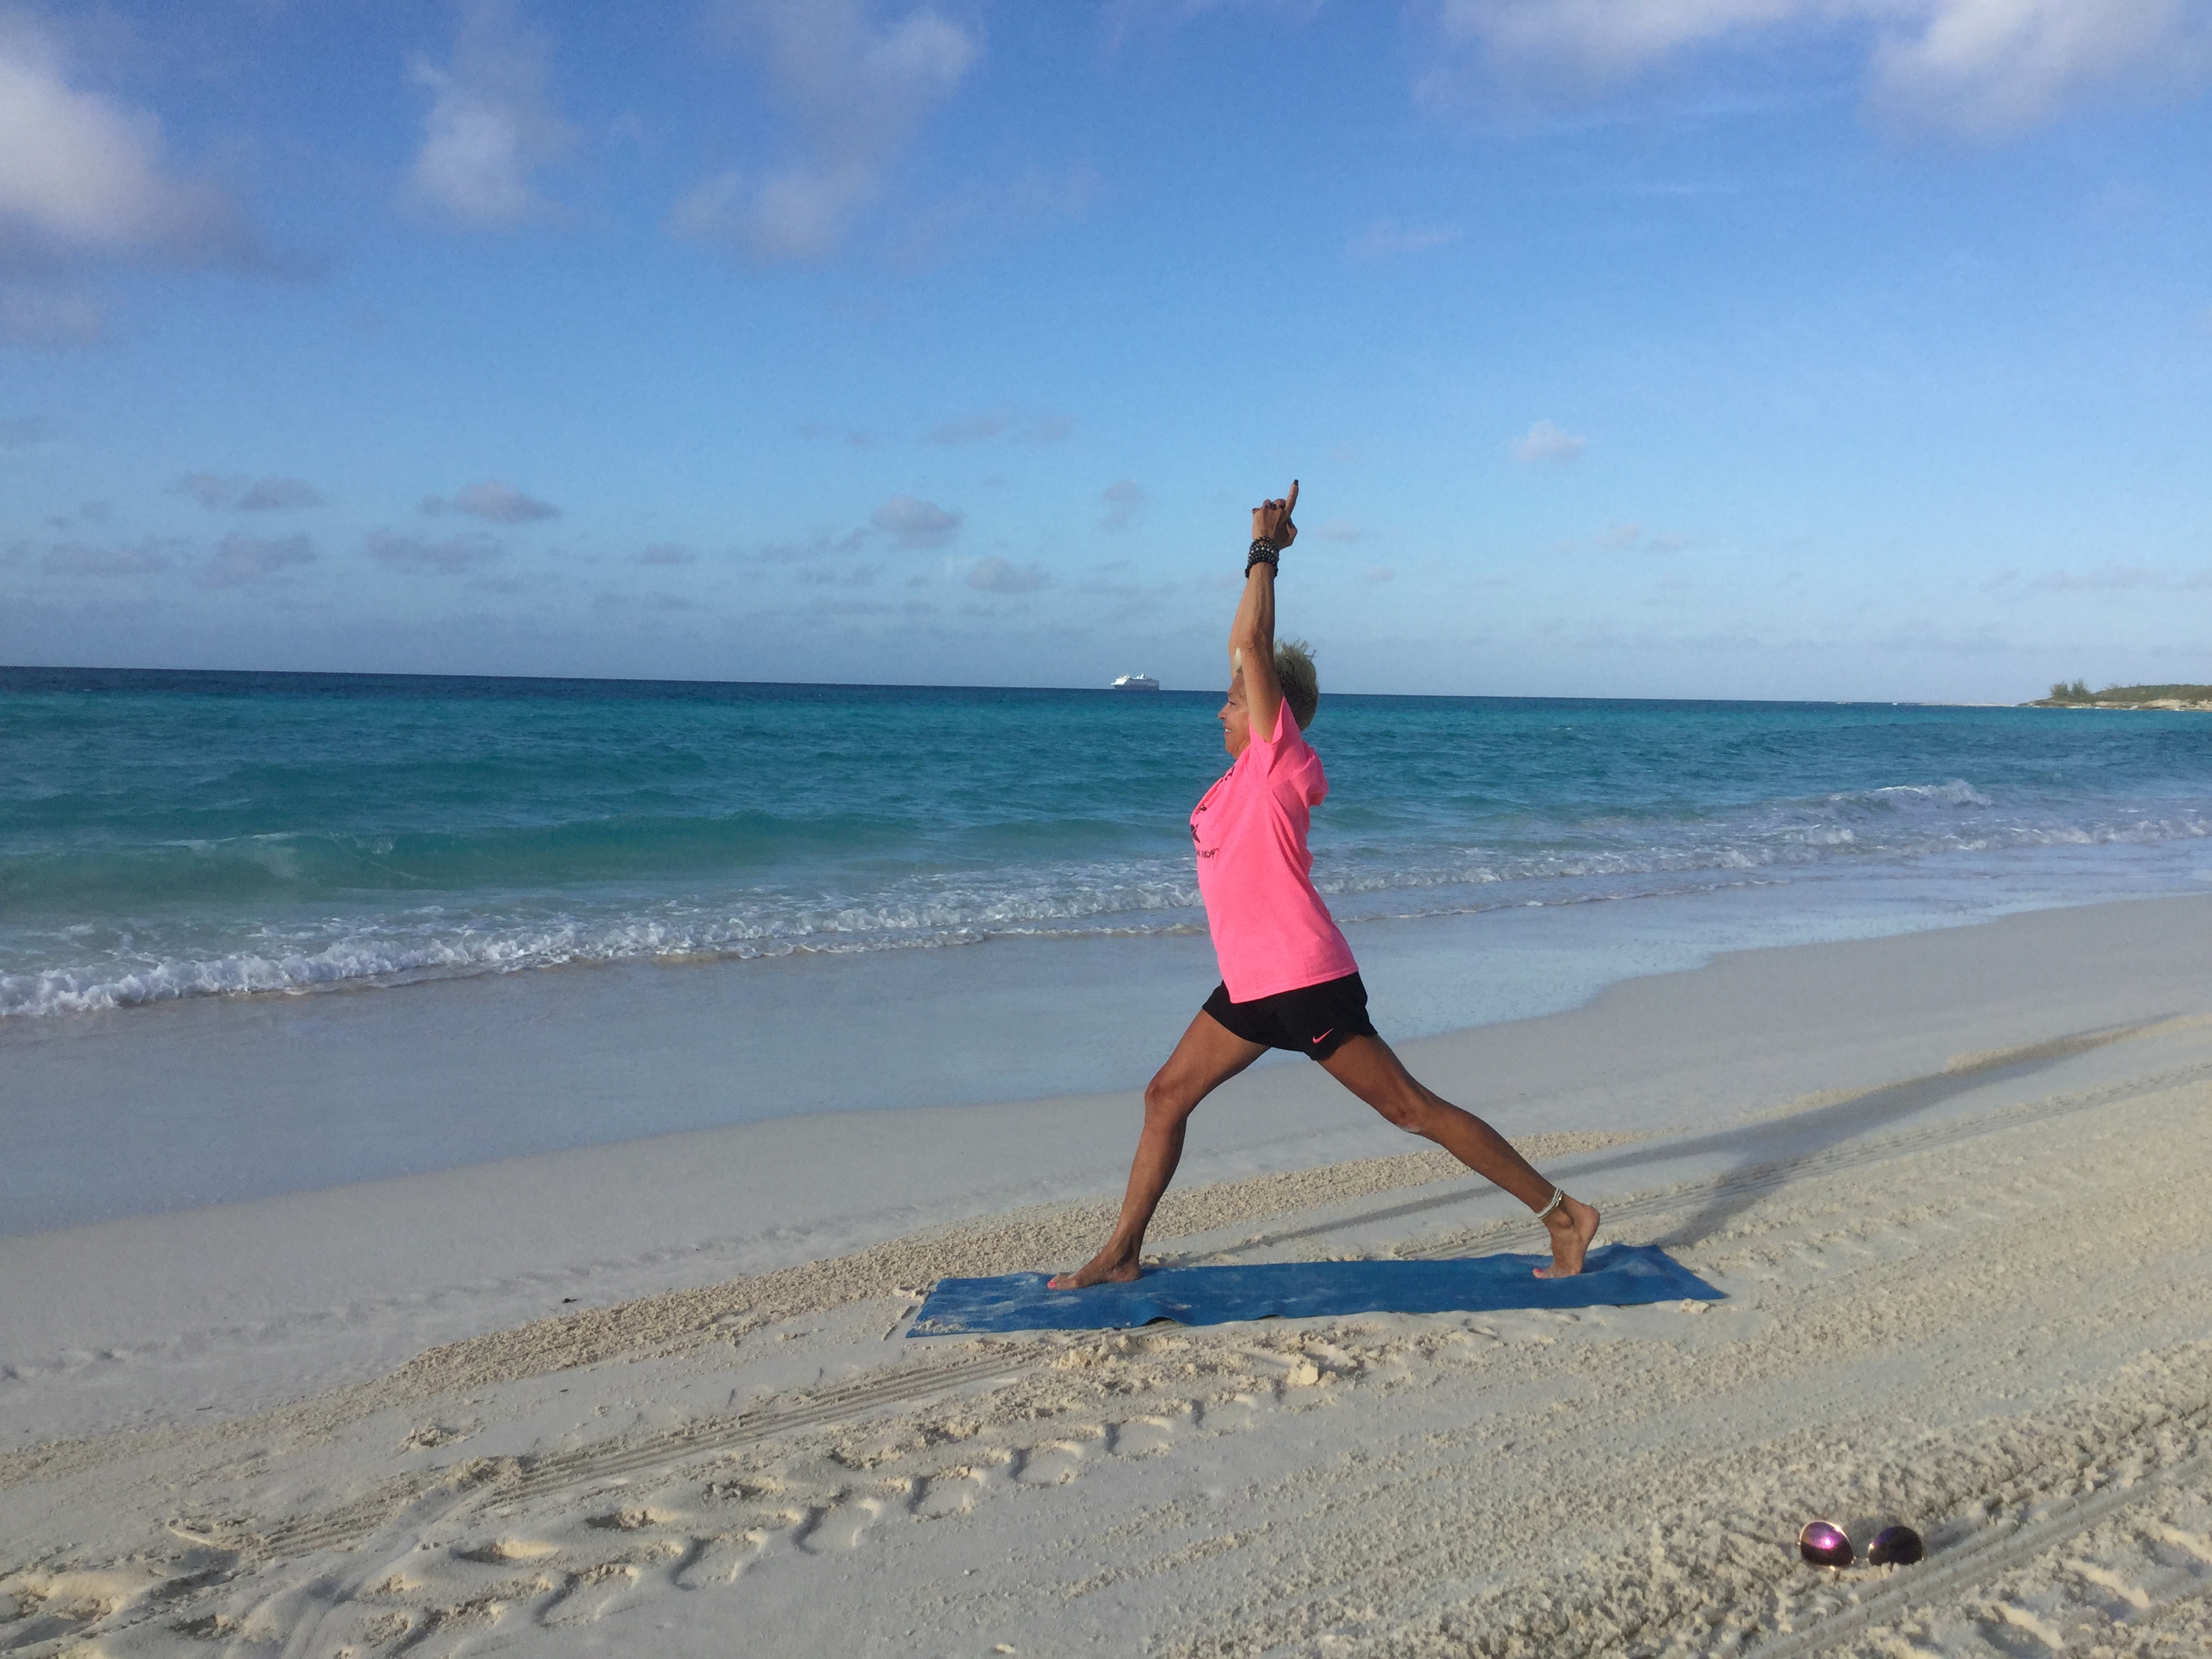
3.) Warrior III

  • Stay in Triangle Stretch if you are just starting yoga.
  • If you can, lift your back leg off the floor. Even one inch is a great starting place!
  • Make sure that both your hips are squared forward.
  • Press your palms together. Hold and breathe 5 deep breaths.
  • Use a chair, table or a wall for support if necessary.

4.) Warrior II Variation

  • Lower your back leg while bending your forward knee.
  • Don’t allow your knee to extend beyond your toes.
  • The toes of your back leg should turn in slightly.
  • Try to get both your hip bones to look forward.
  • Extend your arms out to your sides.
  • Breathe deeply for 10 counts.
  • Lift your forward heel and give your foot a workout!
  • Step your back leg if you need more support.

5.) Strong Peaceful Warrior

  • Remain in Warrior II Pose.
  • Make tight fists.
  • Bring your left elbow back as far as you can.
  • Extend your right arm up and back. Follow it with your eyes.
  • Gazing upward, hold this position for 5-10 deep breaths.

6.) Warrior I Knee Dips

  • Put your right leg forward; put your back heel up off the ground.
  • Both sets of your toes should face to your right side.
  • Clasp your fingers together, with index fingers pointing upward.
  • Inhale deeply, then exhale slowly, lowering or dipping your back leg to your mat.
  • Inhale as you come up; exhale as you lower for a total of 10 dips.
  • Step in for more support and do a quick dip if you can’t do the full dip.
  • Step your back leg out, arch your back, and go real slow with many repetitions for more of a challenge.

7.) Up Dog/Down Dog

  • For Down Dog, start on all fours. Put your hands below your shoulders, with your knees directly below your hips.
  • Slowly press into your hands while lifting your sitting bones up.
  • Keep your gaze on your knees.
  • You may come down and breathe deeply on all fours if the above is too difficult.
  • Walk your legs back, allowing your heels to touch your mat. Bend each leg and breath here for a few counts.
  • For Upward Dog, slowly lower your sitting bones while lifting your chin up.
  • Try not to let your shoulders and neck sag into one another. Lift your chin and push your shoulders down. Press through the palms of your hands. Keep your arms directly below your hands.
  • Move into Up Dog again. Repeat both exercises 3-5 times.

8.) Down Dog Side to Side

  • From Down Dog, squeeze your sitting bones.
  • Twist from side to side, with legs clasped together, for 10 counts.

9.) Elbow Leg Lifts

  • Start on all fours. with your hands directly below your shoulders and your knees directly below your hips.
  • Lower to your elbows if you can!
  • Lift and lower your left leg 10-20 times.
  • Repeat with your right leg.
  • Even a lift of 1 inch is a fantastic place to start!

10.) Three Legged Dog Into Half Moon Pose

  • Straighten your right leg.
  • Extend your left leg up behind you.
  • Use a chair, table or wall for support.
  • Walk your right hand about one foot beyond your toes.
  • If you can, open your left hand and lift it up.
  • Your arms should extend directly out from your shoulders.
  • Breathe deeply for 10 counts.

11.) Half Moon Stretch

  • From your Half Moon Pose, grab your foot (if you can; this is difficult).
  • Stretch and breathe here for 10 counts.
  • You may always use support if needed.
  • Raise your leg just a bit each time when you first start doing this. Over time, you will notice yourself getting stronger and more flexible over time.

12.) Extended Side Angle

  • Lower your back leg while bending your forward leg.
  • Extend over your forward knee.
  • Breathe deeply for 10 deep breaths.
  • Step your back leg in for more support.

13.) Forward Bending Stretch

  • Shake out your legs
  • With feet hip distance apart stretch arms up over your head with a deep slow breath.
  • Lace your fingers together.
  • Exhale, slowly lowering your arms out in front of you.
  • Breathe in again and stretch up and lower again for 5-10 deep breaths.

14.) Tree Pose

  • Spread your toes wide while placing your right foot on your mat.
  • Place your left foot on your ankle.
  • Raise your arms and press your palms together. If this is too difficult, place your hands on your hips instead.
  • If you can, raise your left foot up your leg. Resting it on your inner thigh as high as you can.
  • Breathe deeply for 5-10 counts.

15.) Hand to Toe Forward Stretch

  • With your left hand, hold your left foot.
  • Stretch your leg out in front of you.
  • Place your right hand on your hip.
  • Breathe deeply for 5-10 counts.
  • Place your hands on your hips and lift your leg forward and breathe.
  • Keep your knees bent, or use a wall for support.

16.) Hand to Toe Side Stretch

  • Slowly move your leg from the previous position, and out to the side.
  • Place your right hand on your hip.
  • Breathe deeply for 5-10 counts.
  • Use a wall for support – this is supremely difficult, so don’t expect to get it on a first try. Practice!

17.) Repeat all 16 exercise on your other side.

  • Your left leg will be forward this time and you will balance on your left leg.
  • You may find each leg will be different, but that’s natural.


Thanks for taking a stand with me. Go forth in strength, balance, and stability!

May peace always be with you!

CROW POSE MINI CHALLENGE

In stormy weather, all birds find shelter, but the eagle is the one bird that avoids it all by flying above the clouds. In fact, it is the storms on the earth that give the eagle the fuel to soar. Unfortunately, we human beings often get our talons stuck in day-to-day worries. God is ready and able to lift us high above. We only need to trade in our worries and trust these amazing words for lift off…

Those who trust in the Lord will find new strength. They will soar high on wings like eagles.

Isaiah 40:31

The first five Yoga Poses below are strength building exercises. Complete these exercises on a regular basis and build up to Crow. When you feel that you are ready for Crow Pose, spread your wings and lean forward into the wind. Of course if you are already in full Crow, “happy flying!”

Relax for a few moments and breathe deeply to get in the flying zone.When you feel you are ready, grab a mat, water, towel and let’s fly!


1.) Hero Pose With Shoulder Stretch

  • Sit on your heels, or cross-legged.
  • Lift your left arm straight up. Bend your elbow and lower your hand to your upper back area.
  • Lift your right hand up to meet your left hand. Clasp them together.
  • Lift your chin, gaze up to heaven.
  • Hold the stretch for 5 -10 deep inhales and exhales.
  • Repeat with your right arm on top.
  • You may repeat this stretch a few more times with each side on top.
  • If your hands do not meet yet, work towards it!

2.) Plank Pose

  • From a seated position, walk your hands out to Plank Pose.
  • Your shoulders should be directly above your wrists.
  • Pull your belly in, with your legs at hip width.
  • Breathe deeply for 10 counts.
  • If you cannot do the full pose, lower to your knees and breathe deeply to build strength.
  • Repeat breathing deeply for 10 counts, and do this 3-5 more times in either position.

3.) Down Dog

  • From Plank Pose, lower your head and lift your sitting bones up.
  • Tuck your head under; look at your knees.
  • Feel a good stretch in the backs of your legs. Keep your heels down.
  • Breathe deeply for 5-10 counts.
  • Place your knees on the mat directly below your hips. Your wrists should be directly below your shoulders.
  • Lower back down to Plank Pose when you complete the exercise.
  • If possible, lower to Plank Pose and lift up to Down Dog for 5-10 deep breaths.

4.) Running Plank Pose

  • Start in Plank Pose.
  • Lift your right foot, bringing your knee to your chest with a big inhale.
  • Exhale, kick your foot back, then place it on your mat.
  • Repeat with each leg for 5-10 counts. Inhale, bringing each knee in and exhaling as you kick back.
  • Speed this up for a bit of fun!

5.) Elbow Plank Pose

  • You may begin on all fours or with your knees lowered. Optimally you should start from Plank Pose.
  • From Plank Pose, lower to your elbows, then back up to Plank Pose.
  • Repeat the process, inhaling in Plank Pose and exhaling in Elbow Plank Pose.

6.) Crow Pose

  • Place your hand stretched out on your mat, with your hands directly below your shoulders.
  • Lean forward. It will give you an indication of how strong you are, and whether you can hold the pose.
  • If you’re feeling confident, place a knee on your elbow.
  • If you’re still confident, place the other knee on your other elbow.
  • Now you’re flying in Crow Position so breathe deeply!
  • If you fall, try again!

Halleluyah!

YOGA CHALLENGE FOR BUILDING STRENGTH (inner and outer strength)

Hit the mat with me and let’s get stronger together!

The yoga class below is chock full of yoga positions to help us feel strong and movements to help us build a strong body. Focusing on the verses of Scripture as we move in and out of these positions, will help us to be strong like God says that we are!

My biggest challenge here is wrapping my head around God’s strength. He is the creator of you and me. If that is not enough, He breathed all the stars into existence and walked on water too. He parted the giant sea and let people walk across it. He also raises people from the dead, including Himself once. He is way beyond strong. Best part? He says He will give us “His” strength! Imagine? He says, Be strong in the Lord and in His mighty power, (Ephesians 3:16).  (Psalm 46:1), tells us to let God be our refuge and strength because He is a very present help in need. And, He tells us that when we feel weakest is when He makes us strongest, (Joel 3:10). What blows my mind is, all that is required for possessing God’s amazing strength is….ask! Then trust Him, believing He will do it!

I hope you enjoy this full body yoga class. I realize that not everyone can do every position listed here. Don’t worry though. I always provide a detailed instruction of each position and a less challenging version too!

I hope you have fun and get stronger and I thank you for sweating with me! Now, let’s get started!

Please take a few moments to prepare your mind and body by sitting comfortably and breathing deeply.

1.) Star Pose Bend and Stretch

  • Stand with your feet out to your sides, toes pointing forward. (the wider your legs, the more difficult the pose)
  • Inhale, stretch upwards, extending your arms overhead. (interlock fingers with pointer fingers extended)
  • Exhale, slowly bending forward. (lead with your chin as you bend, stretching out and then down)
  • About halfway down, twist slightly to your right knee. (opposite arm, then gently pulls head to knee)
  • Repeat on each leg, pulling your head to each knee for 10 times on each leg.
  • Always begin with the Star Pose Stretch up before bending to each side.
  • You may only reach your hip, thigh, knee, or ankle at first. Simply do the exercise from there. You will still be building strength from where ever you may begin!


2.) Extended Leg Squat

  • Bend your knees while placing your hands in front of you. (gently lowering your torso)
  • Extended your left leg to the side and stretch.
  • Lift your sitting bones while keeping knees bent.
  • Extend your right leg to your side and stretch.
  • Repeat 2 more times.
  • When you are on your left leg with your right leg extended again, position your right toes to the side while lifting your back left leg.

3.) Warrior III

  • Rise into Warrior III.
  • If you can, press your palms into prayer pose.
  • Breathe deeply for 20 counts.
  • If you need support keep your palms on the mat, or use a sturdy chair, desk, table or wall for support.
  • Repeat the process of Extended Leg Squat into Warrior III balancing with your left leg on your mat!


4.) Warrior Dips

  • Stand with your legs together.
  • Step out with right leg into Warrior I position.
  • Your hips should be squared, facing forward.
  • Press your palms together with your pointer fingers extended.
  • Inhale, raising your arms over head and straighten both your legs. (back heel should be up)
  • Exhale, bending both your knees. (the deeper the bend, the greater the challenge)
  • Lift with inhales and straight legs.
  • Lower with exhales into dips by bending your knees.
  • Repeat with your right foot forward 10 -30 times.
  • Walk your back leg in for better balance; keep your hands on your hips, and dip as low as is comfortable for you for a less intense challenge!

5.) Star Stretch to Warrior II

  • Inhale in a Star Stretch position, arms overhead.
  • Exhale, pivoting your right foot to your right side. (your toes are pointing forward or to the right side)
  • Bend your right leg into Warrior II.
  • Try to keep your hips looking at the front of the room or forward facing.
  • Open your arms wide. (extending out from your shoulders)
  • Lift your forward foot for an added foot, ankle, and calf stretch.
  • Inhale again into Star Stretch, then exhale again into Warrior II.
  • Repeat 5-10 times.
  • Walk your legs in for less of a challenge!

6.) Peaceful Warrior 

  • Same starting position as Warrior II.
  • Lift your forward right arm and follow it back with your head.
  • Let your back left arm lower behind your torso or leg.
  • Breathe deeply for 5-10 counts!

 7.) Extended Side Angle

  • Bring your back left arm up and over your forward knee.
  • Your forward right arm may rest on your thigh or knee, even your hip.
  • Breathe deeply for 5-10 counts.
  • Move slowly from Extended Side Angle to Peaceful Warrior 5 times! (only the arm position changes)

8.) Warrior II 

  • Lift your hands over your head, and press your palms together.
  • Lift your forward right heel.
  • Breathe deeply for 5-10 counts.
  • Walk your legs in closer for less of a challenge!

9.) Star Stretch to Wide Legged Horse Stance Position

  • Stretch into Star Pose Stretch with a big inhale. (both toes are pointing forward)
  • Exhale and release your arms pressing your palms together while bending your knees out to the sides. Toes should be pointed out slightly. (knees should not extend over toes)
  • Repeat the stretch up with big inhale, then exhale, releasing your arms and bending your knees to the sides.
  • Repeat the process 10 times.
  • For a less intense version, slightly bend your knees and do not extend them so far to the sides!

10.) Repeat numbers 2-10 with your left leg forward!

 11.) Seated Shoulder and Chest Opener

  • Sit on your heels.
  • Stretch your left arm up, bending it behind your head.
  • Stretch your right arm up behind you.
  • Let your fingers meet, or move them as close together as you can.
  • Stretch and breath deeply for 10 counts.
  • Repeat with opposite arms!


12.) Child’s Position

  • Lean forward.
  • Rest your forehead on the mat.
  • Extend your arms above you on the mat.
  • Rest here for 10 deep breathes!

13.) Downward Dog

  • From a Child’s Position, lift your sitting bones.
  • Your arms are directly below shoulders.
  • Your feet are directly below hips.
  • Your legs are as wide as your hips.
  • Stretch and lengthen your legs into Downward Dog.
  • Breathe deeply for 5 counts.
  • Remain in a Child’s Position for a less intense challenge. Or come on your hands and knees – try curling your toes under and lifting your sitting bones up. Repeat a few times!

14.) Plank Position

  • All hand, feet, and hip positions remain the same as Downward Dog.
  • Simply lower your sitting bones from Down Dog into Plank Position.
  • Deeply breathe for 10-30 seconds.
  • You may be on your knees or lower to your knees during the exercise and still build strength in your core!

15.) Knee to Chest Planks

  • From Plank Position ( or on your knees in a Plank position) please inhale deeply.
  • Bring your right knee to your chest and exhale.
  • Repeat bringing each knee to your chest for 10 counts each leg.
  • Come to Child’s Pose.
  •  Repeat 10 more counts on each leg. (Total is 60 times or 30 times each leg)
  • Lower your knees to your mat and do this exercise from there for a less intense version!

16.) Cobra Pose

  • Lie down forward facing on your mat.
  • With hands directly below shoulders, press your palms into the mat, raising up into Cobra Position.
  • Your toes are flat on top of the mat.
  • Your head stretches back. (great for a neck and chin stretch)
  • Breathe deeply up to 10 counts.
  • Lower to your elbows for a less intense version!


17.) Elbow Plank into Plank Pose

  • Lie flat, placing your elbows directly below your shoulders.
  • Curl your toes.
  • Lift your sitting bones.
  • Balance here for 10 seconds.
  • Then, place each palm directly below each shoulder.
  • Lift your torso up into Plank Pose.
  • Then, lower your torso to Elbow Plank Pose.
  • Repeat 5-25 times.
  • You can always do more counts or less counts and build up strength, or do the entire process with your knees on the mat!

18.) Crow Position

  • With palms below shoulders, walk your legs in.
  • Bend your elbows and lift one knee up.
  • Place your knee on your elbow.
  • If you feel strong and balanced, lift your other knee up onto your other elbow.
  • Hold and breathe deeply for 5-20 counts.
  • Continue lifting one knee then the other until you get stronger. Come to your hands and knees and bring each knee to your chest for 10-20 counts or rest in Child’s Pose for a less intense version of the position!


19.) Bowing Position

  • Sit on your heels, interlocking your fingers behind you.
  • Inhale, lift to your knees, lean back, and lift your palms.
  • Exhale, slowly round your shoulders, and lower your head to the mat.
  • Keep your palms pressing upward.
  • Repeat for 10-20 counts, inhaling up and exhaling down.
  • Use a pillow or chair seat to rest your head as you come down. Place your hands on your hips or lower back if interlocking your fingers is too challenging at first!

20.) Hero Position

  • Sitting on your heels, extend your knees to the sides.
  • From there, with a deep inhale walk your hands forward as far as you can.
  • If you can, lower your head to the mat.
  • Breathe deeply for 30 seconds to 1 minute.
  • Rest your head on a chair seat or pillow or lower to your elbows for a less intense version!


21.) Savasana

  • Just say ahhhh! You made it!
  • Relax here to reap the benefits of your physical practice.
  • Breathe deeply.
  • Try to imagine your wonderful new life of Godly strength!

Be strong, Be brave, Be fearless! You are never alone! Joshua 1:9

BREATHING WARM UP YOGA CHALLENGE (Seated breathing exercises to begin each yoga class or for a quick pick-me-up/stress buster)

Join me for a quick pick me up/stress reliever. Or take 5-10 minutes before each Yoga Challenge to complete this. It will fire up your body, boost your energy, relieve stress, and get you focused and ready for your workout!

Below you will find 9 basic exercises with focused deep breathing. Breathing with movement will improve your circulation, remove toxins from your body, and keep your body running on optimal!

You can also fill your lungs with the peace of God as you breathe and soar above circumstances that may be weighing you down. Let go and enjoy the ride, for God says that,

…those that hope in the Lord will renew their strength. They will soar on wings like eagles.

Isaiah 40:31

Eagles fly the strongest, swiftest and highest of all birds. They are also dependent upon storms and high winds – it’s what makes them soar!

1.) Cross Legged Breathing Meditation

Try to surrender all thoughts. Give up your cares, worries, doubts and fears.

Meditate on the Bible verse as you inhale and exhale slowly, deeply and deliberately.

Focus and breathe for 5-10 long deep breaths. Have fun and really try to remember to inhale and exhale, deep, strong and long!

When you are ready, proceed to the next exercise.

2.) Neck Stretch

Sit up tall.

Make sure your hips are on top of your sitting bones with your stomach pulled in, face relaxed, neck long and shoulders pressed down.

Take it slow and inhale like you are pulling all the air around you into your lungs.

Exhale slowly, turning your head to the right.

Repeat on each side, slowly inhaling in the middle and slowly exhaling as you turn your head for 5-10 times each side.


3.) Arm and Upper Body Stretch

Deeply inhale, lifting your arms slowly up from your sides.

Look up for a deeper stretch. Hold it for a few moments.

Slowly exhale, gently releasing your arms to the mat.

Repeat for 5-10 long, deep, slow breaths.

4.) Seated Side Stretch

Inhale slowly lifting your arms up from the sides, just like #3 above.

Exhale, gently leaning over to the side.

Repeat for 5-10 deep, slow breaths on each side.


5.) Neck, Shoulder, Heart Opener

With hands clasped behind your head, inhale deeply.

Exhale deeply, folding forward. Round your torso as you fold.

For a deeper stretch, inhale again and slightly lean back. Push your chest forward while your elbows back, and look up.

Repeat with the inhales, stretching up and back with the exhales rounding forward. Repeat the process for 10-25 deep breaths. Try it 1-3 minutes and see how you feel! Go slow and stretch!

6.) Neck and Shoulder Side Stretch

With hands clasped, inhale deeply while stretching up.

Exhale deeply, folding gently to alternating knees for 10-25 or longer deep breaths.

7.) Intense Side Stretch

With hands clasped, inhale and stretch up like #5 again.

Exhale, lean over to your side, and touch your elbow to your knee, if possible.

Repeat with big inhales in the middle and big exhales out to the sides for 10-20 deep breaths each side.

8.) Seated Eagle Arm Stretch

Bend both elbows out in front of you.

With a normal breath, slide your left hand under your right elbow. Let that hand continue sliding up and around your right arm. Your palms should meet.

Hold for 5 long inhales and exhales. Remember to keep your shoulders down, neck long and back straight.

Repeat with right hand sliding under your left elbow and circling your arm.

9.) Cross Legged Forward Stretch

Inhale deeply, keeping your back straight, shoulders down, neck long, and your stomach pulled in.

Exhale, slowly folding forward. For a deeper stretch, lead with your chin as you fold, keeping your back straight.

Slowly, and with deep inhales and exhales, repeat the process up to 10 times.

You can walk your hands out and lower your head for an even deeper stretch!

Breathe deeply and yoga on!

xxoo

<3


LEGS CORE AND MORE YOGA CHALLENGE (PHYSICAL LEG AND CORE)

Celebrate your magnificent body by challenging it!

This Segment is for those of you who need to “up'” your yoga workouts. Don’t fear! I would never leave anyone out. I have included a less challenging version for each exercise. This way, you can start at your level of fitness in each yoga exercise as you see fit. Include this segment in your workouts at least twice a week. It will make you stronger and more powerful in your body and your life. Yoga on and “Power Up!”

Build shapely legs and a solid core in time for summer. Be forewarned! This “Power Up” Segment will put the burn in your legs and the fire in your core. Ignite this segment with God’s mighty words, and let Him fuel the inner You. Make today the day you break up with your boring old Yoga routine and plug into the real power zone!

God is my strength and power.

2 Samuel 22:33


1.) Standing Squat Crunch

Stand with your feet hip width apart. With hands behind your head, inhale and squat back. Squat like you are sitting back into a chair, leading with your bottom. Then, explode up while exhaling, lifting your knee to touch your elbow. Alternate sides and do this 10-25 times on each side. Ultimately, you want to increase the count up to 50 times each side when you feel able.

2.) Warrior I Push Outs

With hands in fists, pull your elbows back as you deeply inhale. Do this while stepping with left foot out to your left side into Warrior I position with straight legs. When you are ready to exhale, bend your forward left leg. Do this while opening up your palms and pushing forward with resistance. Go slow. Let the heel of your palm lead the push; try to really resist for building hand, wrist, and arm strength. Exhale strongly as you resist. Release the last bit of oxygen out of your lungs. Do this on each side 5-10 times. For more intensity, widen your legs in Warrior I. For less intensity, bring your legs closer together.

3.) Exploding Squat Side Punch

Inhale quickly, squatting back with fists blocking your face. Lead with your bottom to torch those lower body muscles. Exhale quickly, exploding up while punching out to your side with your right fist. Repeat this 10-25 times on each side. The goal is to do this 50 times each side; work up to it! Squat back lower for more intensity, and do more repetitions on each side. Slightly squat back slowly with less repetitions.

4.) Knee Hug into Warrior III

Stand tall. Inhale deeply, lifting your right knee and pulling it into your chest. Raise your opposite hand for more intensity. Exhale deeply, releasing your knee and slowly letting your fingers find the mat for support. Stretch your leg up behind you. Inhale again, hugging your knee in and slowly standing up again on your left leg. Repeat this 10 times on each leg. For more intensity, go slow and do more repetitions. For less intensity, use a chair, table or counter top for support. Reduce the number of repetitions to what you’re comfortable doing.

5.) Half Moon Pose

Gently take off into Half Moon Position from Triangle Pose. Your left leg toes should point forward, with your left hand about 12 inches out in front of you. Raise your right hand and let your right heel push out through your right leg. This positioning will help keep you balanced. Stretch and breathe. Hold for 30 seconds to 1 minute for more intensity, and the place the hand that is touching your mat on your ankle. For less intensity, use a wall, sturdy chair or counter for support. If you fall, simply get up and try again. Hold Half Moon pose for 10-30 counts. Repeat on your other leg.

When you feel comfortable grab your foot and stretch some more! You can always do each leg again a few more times, should you feel ready.

6.) One Legged Chair Squats

Place your left foot on your right thigh and squat back, leading with your bottom. Do not allow your standing knee to bend beyond your toes. Hold for 10 long breaths and repeat on your other leg. For more intensity, inhale as you straighten your standing leg and exhale as you bend into squat, for a total of 5-20 times on each leg. You can go low in the squat and do more repetitions for added intensity. Use a chair, table or counter top for support if you need to and do less reps for less intensity.

7.) Eagle Pose

Stand tall. Picking up your left leg, place it over your right thigh, and then place it behind your right leg. Let your left leg twirl around your standing leg until your toes pop out on the left side of your leg. Or, you can simply keep your toes behind your leg. Try to keep your hips forward. Your left arm should then slide under your right arm and also twirls up the arm. Ultimately, both palms should look at one another when you get into this position. If you find that your body does not move that way yet, simply relax and ease into the space that feels right for you today. Wherever you find yourself is a great place to start today. Now repeat everything on your other leg and arm. Your right leg goes over left thigh, and right arm slides below and up left arm.

Enjoy! Have fun…and be blessed!

HALLELUYAH!

YOGA FOR VITALITY CHALLENGE ( Yoga with a twist for everyBODY)

This yoga segment is designed for most fitness levels.  Enhance your twisting with a couple verses of Scripture provided below and twist for your mind, body, and soul!

Get Twisted and improve the health of your internal organs and build your core. According to Livestrong, twists encourage the flow of oxygenated blood while eliminating toxins and metabolic wastes from your body. They also aid in bloating or digestive problems. Your shoulders, chest, back and spine have a chance to relax in twists and you will increase flexibility in your spine and waist muscles.

At first glance, twists appear chaotic. Any normal person knows a body should not be bending and twisting like that. That’s the beauty of a twist: a body gone wild! Don’t be fooled; to move into a twist from a standing position requires so much more. Your feet need to settle into the earth and your legs must draw strength from the stability of the feet. Your entire core or inner body  needs to lengthen. You must inhale from the bottom of your body to the top of your head, drawing a long deep breath by pulling up and out of your waist, chest, hips, spine. And when it is impossible to hold any more breath inside you, then you twist with a long exhalation. The breathing helps you twist better.

What I love about twists is that your insides get revitalized. As you stand firm with a solid foundation, you appear all tensed up and out of control but your core keeps you strong. Sometimes in our lives we get all twisted up too but God tells us to chill. Sometimes the knots are so twisted up we can easily forget that the God that breathed the stars into existence and turned water into wine can help us. Seriously, all we need to do is believe. Seems too easy, but God promised He would help us. In this yoga segment get twisted but let Him untwists all the  knots inside that are binding you now.

…”cast your worries on Him, because He cares for you. 1 peter 5:7

…Let your roots grow down into Him. Let your lives be built on Him. Colossians 2:7

dscn2997

dscn2996

1.) Chair Pose into Chair Pose Twist

Start by placing your feet together. Bend your knees and slightly bend back as if you were going to sit on a chair. Raise your arms up, then inhale and exhale 3-5 times long and deeply. You may stand up for a moment or continue in a chair pose for the twist.

In chair pose position, on your last inhale and exhale bring your palms together in prayer pose. Firmly press them together. Inhale deeply, lifting your entire upper body. Exhale deeply as you twist. Let your left elbow twist to the outside of your right leg. Hold the pose as long as you like or repeat on your other side.

Make it a flowing sequence of movement by always standing up before you bend into chair pose. Bend into chair pose with arms up and then into prayer pose. Stand up again and bend into chair pose before you twist to each side. Repeat the sequence once or maybe 3 times each side.

You may also widen your feet for better balance in chair pose and do not bend back too far. Always stand between each movement so your legs don’t get tired and slightly twist to each side.

dscn3097

dscn3098

2.) Chair Pose One Arm Stretch and Twist

From chair pose, twist to the right side, and simply lower your left arm down while extending your right arm upward. Hold the twisted stretch, then inhale and exhale long and deeply. Breathe into any tensions that may arise.

dscn2922

dscn2923

3.) Low Lunge Back Knee Bend into Reverse Twist

Step your left foot forward into a lunge pose. Sink your hips, placing your back knee on the ground. Inhale and exhale long and deeply for a minute, invigorating your body and mind while resting your attention on God.

For the twist, bend your right back leg and let your torso follow. Place your right hand directly below your right shoulder. Let your left arm twist your body as you look up. Inhale and exhale long and deeply for 3-10 counts if you like, or what ever feels good for you.

Make you lunge higher or simply stay on a bended back right knee if you find it too challenging. If your right hand does not make it to the floor, stay up. Do the twist by placing your right arm just outside your left thigh. Inhale and exhale long and deeply as long as you feel comfortable.

dscn2939

dscn2940

4.) Bended Knee Reverse Twist and Stretch

Step your right foot forward, bending your back left knee. Inhale long and deeply, lifting your entire upper body. Then as you exhale twist, placing your left hand on your right thigh. Raise your right arm for a deeper twist. Repeat on your other side for 3-10 long and deep twisted inhales and exhales, or as many as you like.

dscn2963


dscn2968

5.) Warrior II Pose into Side Angle Pose

Step your left foot forward, bending your knee. Keep your left back leg straight if possible. Sink your hips, raising your arms up and out to the sides. Inhale, pulling up and out of your belly, then lifting your chest. Keep your shoulders pressed down with an extended neck. Look out past your arms. Stand firm and let the quietness of your roots be the source of your strength.

Move from Warrior II position into Side Angle pose by lifting your right arm up and extending it up and over. Meanwhile bend your left arm, resting it on your left thigh. Stretch and inhale and exhale long and deeply 3-10 times. Repeat on your other side.

Walk your back leg in and slightly bend your front knee if you find it too challenging. Your hand may also rest anywhere that feels comfortable on your front leg.

dscn2971

dscn2970

6.) Side Angle Stretch and Twist

Once in a Side Angle position, lower your forward left hand to the floor and extend your right arm up. Inhale and exhale long and deeply 3-10 times.

You may come back to a standing position or come back to a Side Angle. Moving from a Side Angle, simply let your raised right arm fall behind. Then let your left arm slide under your left thigh and meet it. Grasp your fingers and look up. This will open your torso in new ways, stretching and strengthening your entire body. Inhale and exhale as best you can long and deeply.

Bring your right arm to your hip. Look up.

dscn3035

7.) Star Pose One Arm Stretch and Twist

Stretch your legs out to the sides at a distance comfortable for you. Bend forward, placing your hands on the ground. Inhale long and deeply and exhale long and deeply, extending and twisting your right arm upward. Repeat on the other side for 3-10 inhales and exhales on both sides. Inhale middle, exhale twisting up.

For a less vigorous approach, bend your knees and  lessen the distance between your legs. Bend over slightly. Let your twist come from placing your hands on the outside of each leg. The other arm can be placed on your hip. Inhale in the middle slightly bent and exhale as you twist to each side. Repeat 3-10 times each side.

dscn3271

8.) Eagle Pose

Stand with your legs and feet together. Raise your left leg, placing it over your right thigh. Try to tuck that leg behind the leg your standing on. If you can twirl it around the leg finishing at the inside of your right foot. Once steady, let your left arm go under your right elbow, twirling it up your arm until your palms meet. Inhale and exhale long and deep 2-4 times. Repeat on your other leg. Left leg twirls left arm goes under and twirls. Right leg twirls, right arm goes under and twirls. Try to keep your body, especially your hips facing forward.

For a less vigorous approach, I would suggest that you do these movements separately. Arms. Then do legs. Play around with each, and see where you end up. One side will feel easier, guaranteed!

dscn2924

dscn2925

dscn2926

9.) Squat Prayer Pose Into Side Twist

Let your legs be hip width apart then bend your knees. Sink your hips all the way to the ground. Press your palms together for a more intense stretch.

From Squat Pose, raise your left arm up then back extending it to your right hip. Stay here. For a more intense stretch, take your right arm out and over the outside of your right leg. Meet the hands, clasp them and stretch upward for 3-10 long and deep inhales and exhales.

For a less vigorous approach, place a rolled up or folded blanket under each heel. Gently begin moving your arms up and around your legs. Stop at a comfortable stretch for you. Inhale and exhale long and deeply.

Lie on your back for a few breaths to absorb the afterimage of each twist. Do you feel lighter? Does your body feel more buoyant? Do you feel more rooted and grounded, perhaps balanced and clear-headed? Enjoy this delightful state of peace and love.

Get Twisted and Yoga on

HALLELUYAH!

LUNGE POSE CHALLENGE (first step of faith)

Anjaneysana, or more commonly called Lunge Pose.

Lunge pose is an approachable yoga pose. It stretches and builds strong sculpted legs, releasing tension in the hips. Practice Lunge Pose regularly and you may be able to raise your arms up and arch your back, engaging your entire upper body for a full body pose.

Sometimes in life, the only available form of transportation is a leap of faith. But soon the doubters appear to shut us down and freeze us up. “It’s impossible!”, screams pride. “It’s risky!”, declares experience. “It’s pointless!”, offers reason. And somewhere in the deep and mysterious chambers of our heart, a teenie tiny voice rises and whispers softly, “Give it a try”

God tells us…

…”do not fear for I am with you” Isaiah 41:10

As we lunge forward in Lunge Pose, let it be the outer expression of our heart’s willingness to take that first step of faith.

DSCN2731

DSCN2735

Directions:

Step forward with your right foot and gently bend over it. Lower your hands or fingertips to your mat for balance and support. Keep your forward knee directly over your foot while straightening your back leg. Sink your hips, relax your shoulders and soften your collarbones. Inhale and exhale long and deeply for 1 minute. Then, try your other leg.

For a more intense stretch, lower your back knee and the top of your foot to your mat. Inhale long and deeply, remaining in Lunge Pose for 1-3 minutes. You may also stretch your arms up and arch backwards, also inhaling and exhalinh long and deeply.

Lay down, relax and breathe long and deeply. Where might you be leaping forward in your life?

xxoo

<3